Why This Matters
The ideal Windows automation environment must:- Stay active without an RDP session
- Maintain consistent resolution at 1024x768 (optimal for computer use models)
- Never restart unexpectedly or require manual intervention
If you or your client already has a Windows VM or physical machine, this guide will help you optimize it for reliable automation.
Setup Guide
Launch Windows Server 2022
You can use any cloud provider or virtualization platform. We recommend AWS EC2 for reliability.Configuration checklist:
- Enable inbound port 3389 for RDP (only for initial setup)
- Save your RDP credentials securely
- Generate and save the access key pair
Connect via RDP
Use your RDP client to connect to the Windows Server. You’ll use RDP for this initial setup, then disconnect permanently once the virtual display is configured.
You’ll need Windows administrator credentials for this setup. If you don’t have them, request them from your IT department before proceeding.
Install and configure Cyberdriver with persistent display
In your Windows VM, open PowerShell and install Cyberdriver:Restart PowerShell, then start Cyberdriver with all the necessary flags:What happens next:
- UAC prompt appears - Click “Yes” to grant administrator privileges (required for driver installation)
- Cyberdriver installs the Amyuni virtual display driver
- The virtual display is enabled and configured to 1024×768
- Windows may prompt for a reboot - Restart if asked
- Cyberdriver connects to Cyberdesk Cloud
- Press Windows key and search for “Device Manager”
- Expand “Display adapters”
- Look for “USB Mobile Monitor Virtual Display”
Disconnect RDP
You can now close the RDP connection permanently.Once disconnected, Cyberdriver will initially see a black screen (the terminated RDP session), but within 30 seconds, the
--black-screen-recovery feature will automatically switch to the console session where the virtual display is active.Verify virtual display is working
From your local machine, verify the setup is working:
- Navigate to the Desktops page in your Cyberdesk Dashboard
- Click on your Windows VM to open the desktop details page
- Click the Tools button in the top right
- Click Take Screenshot
- Initially: May show a black screen
- After 30 seconds: The Windows desktop should appear in the screenshot
- ✅ The virtual display is active
- ✅ Black screen recovery successfully switched to the console session
- ✅ Cyberdriver can now see and control the desktop without RDP
The 30-second delay is the black screen recovery check interval. The first time it runs, it detects the black screen and switches to the console session automatically.
Finish setup
Your Windows VM is now fully configured for automation:
- In the Cyberdesk Dashboard, rename your desktop to something descriptive (e.g., “Production Windows Server”)
- Verify the screenshot shows the Windows desktop (not a black screen)
- Create a test workflow to confirm everything works
- ✅ Has a persistent virtual display at 1024×768
- ✅ Automatically recovers from black screens
- ✅ Stays active with keepalive mode
- ✅ Works completely without RDP or RustDesk
- Cyberdriver will switch to viewing the RDP session (you may want to disable Cyberdriver while working manually)
- When you disconnect RDP, Cyberdriver will automatically switch back to the console session within 30 seconds
- Everything continues working seamlessly
Fallback: RustDesk-Based Setup
If the virtual display driver doesn’t work well on your system—for example, if the resolution is stuck at 800×600 or you experience display issues—you can use RustDesk as an alternative. This approach trades additional dependencies for easier manual desktop access.Launch Windows Server 2022
You can use any cloud provider or virtualization platform. We recommend AWS EC2 for reliability.Configuration checklist:
- Enable inbound port 3389 for RDP (only needed for initial setup)
- Save your RDP credentials securely (you’ll only need them once)
- Generate and save the access key pair
Connect via RDP
Use your RDP client to connect to the Windows Server. You’ll only need RDP for this initial configuration—RustDesk will replace it.
Install RustDesk
Copy this link into your Windows VM’s browser to download RustDesk:Once downloaded, run the installer to complete the installation.
Configure RustDesk security
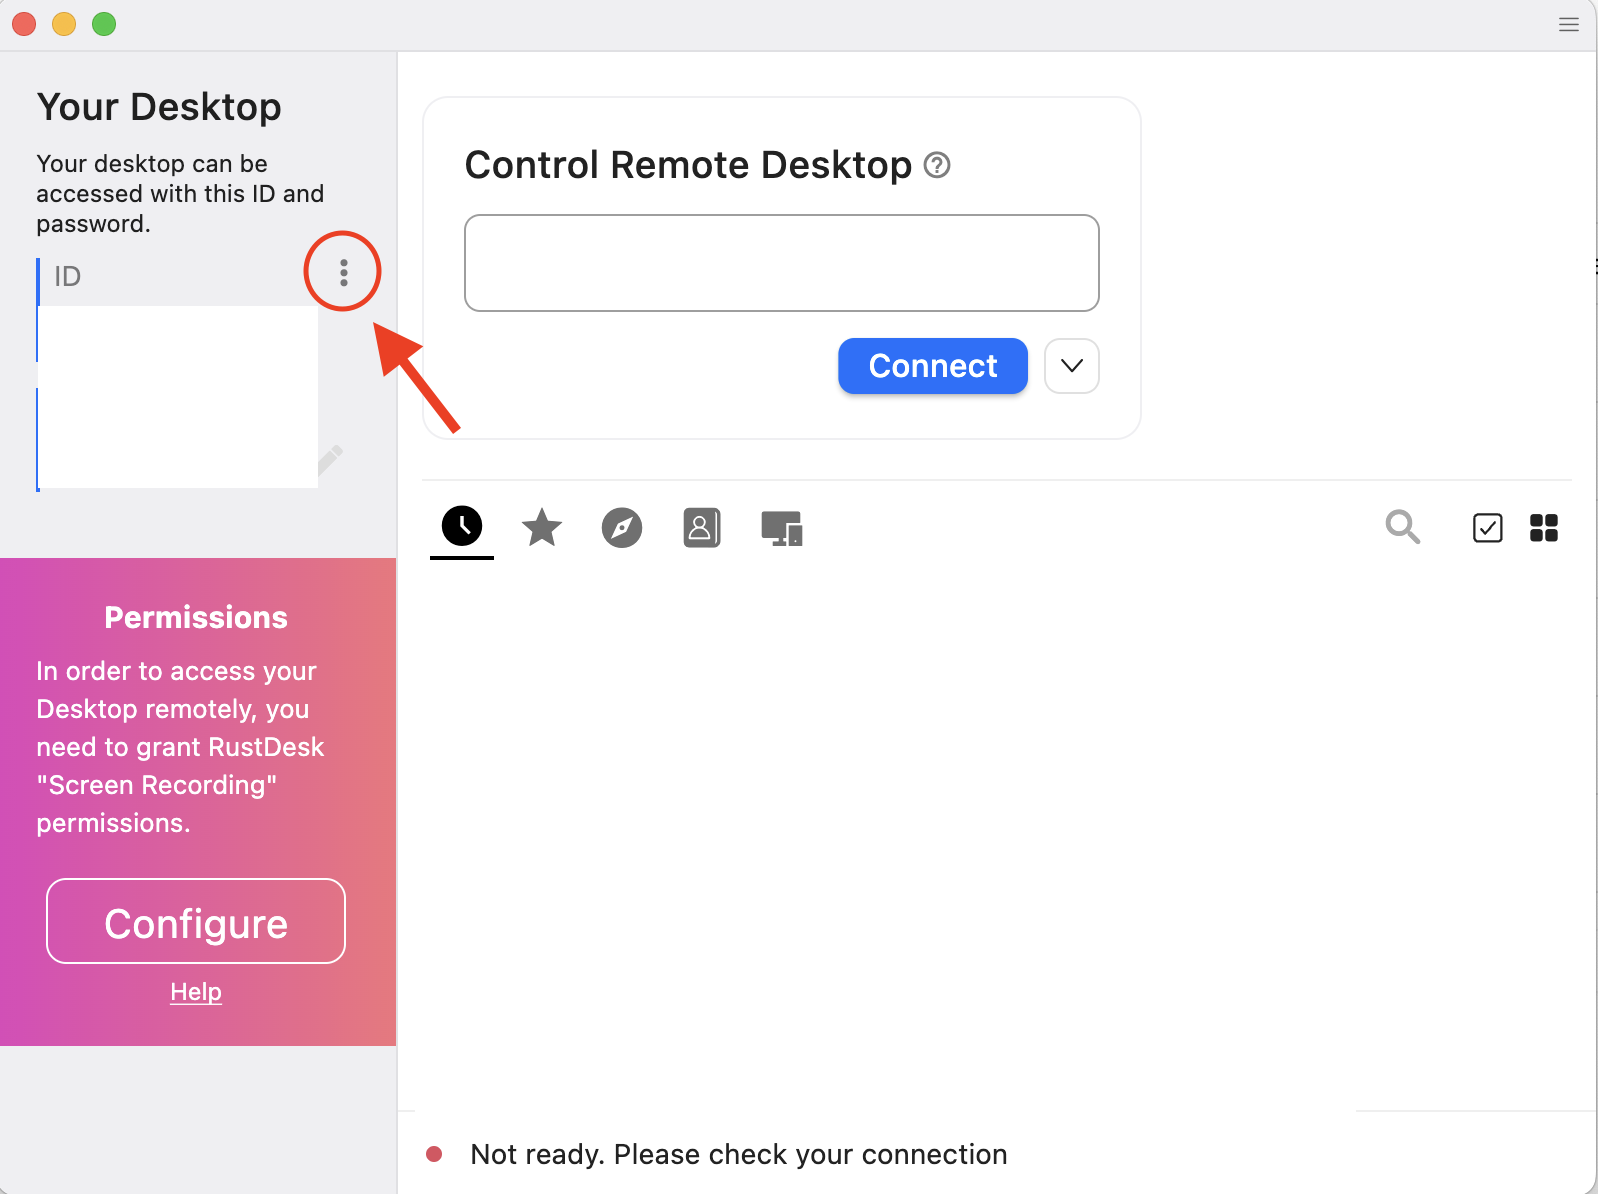
Launch RustDesk and configure a permanent password:
- Click the three dots menu in the left sidebar
- Navigate to the Security tab
- Click Unlock Security Settings (blue button)
- Scroll to Password section
- Select Use permanent password
-
Enter a strong password and click Save

- RustDesk ID (displayed on the home screen)
- Permanent password (you just created)
Install RustDesk locally
On your local machine (laptop/desktop):
- Download RustDesk from rustdesk.com
- Install and launch the application
- Enter the ID and password from Step 4
- Click Connect
- Click the Display icon in the RustDesk toolbar
- Select Scale adaptive
- This scales the remote display to fill your local monitor for easier viewing
Disconnect RDP and set resolution
You can now close the RDP connection permanently. Continue using RustDesk:
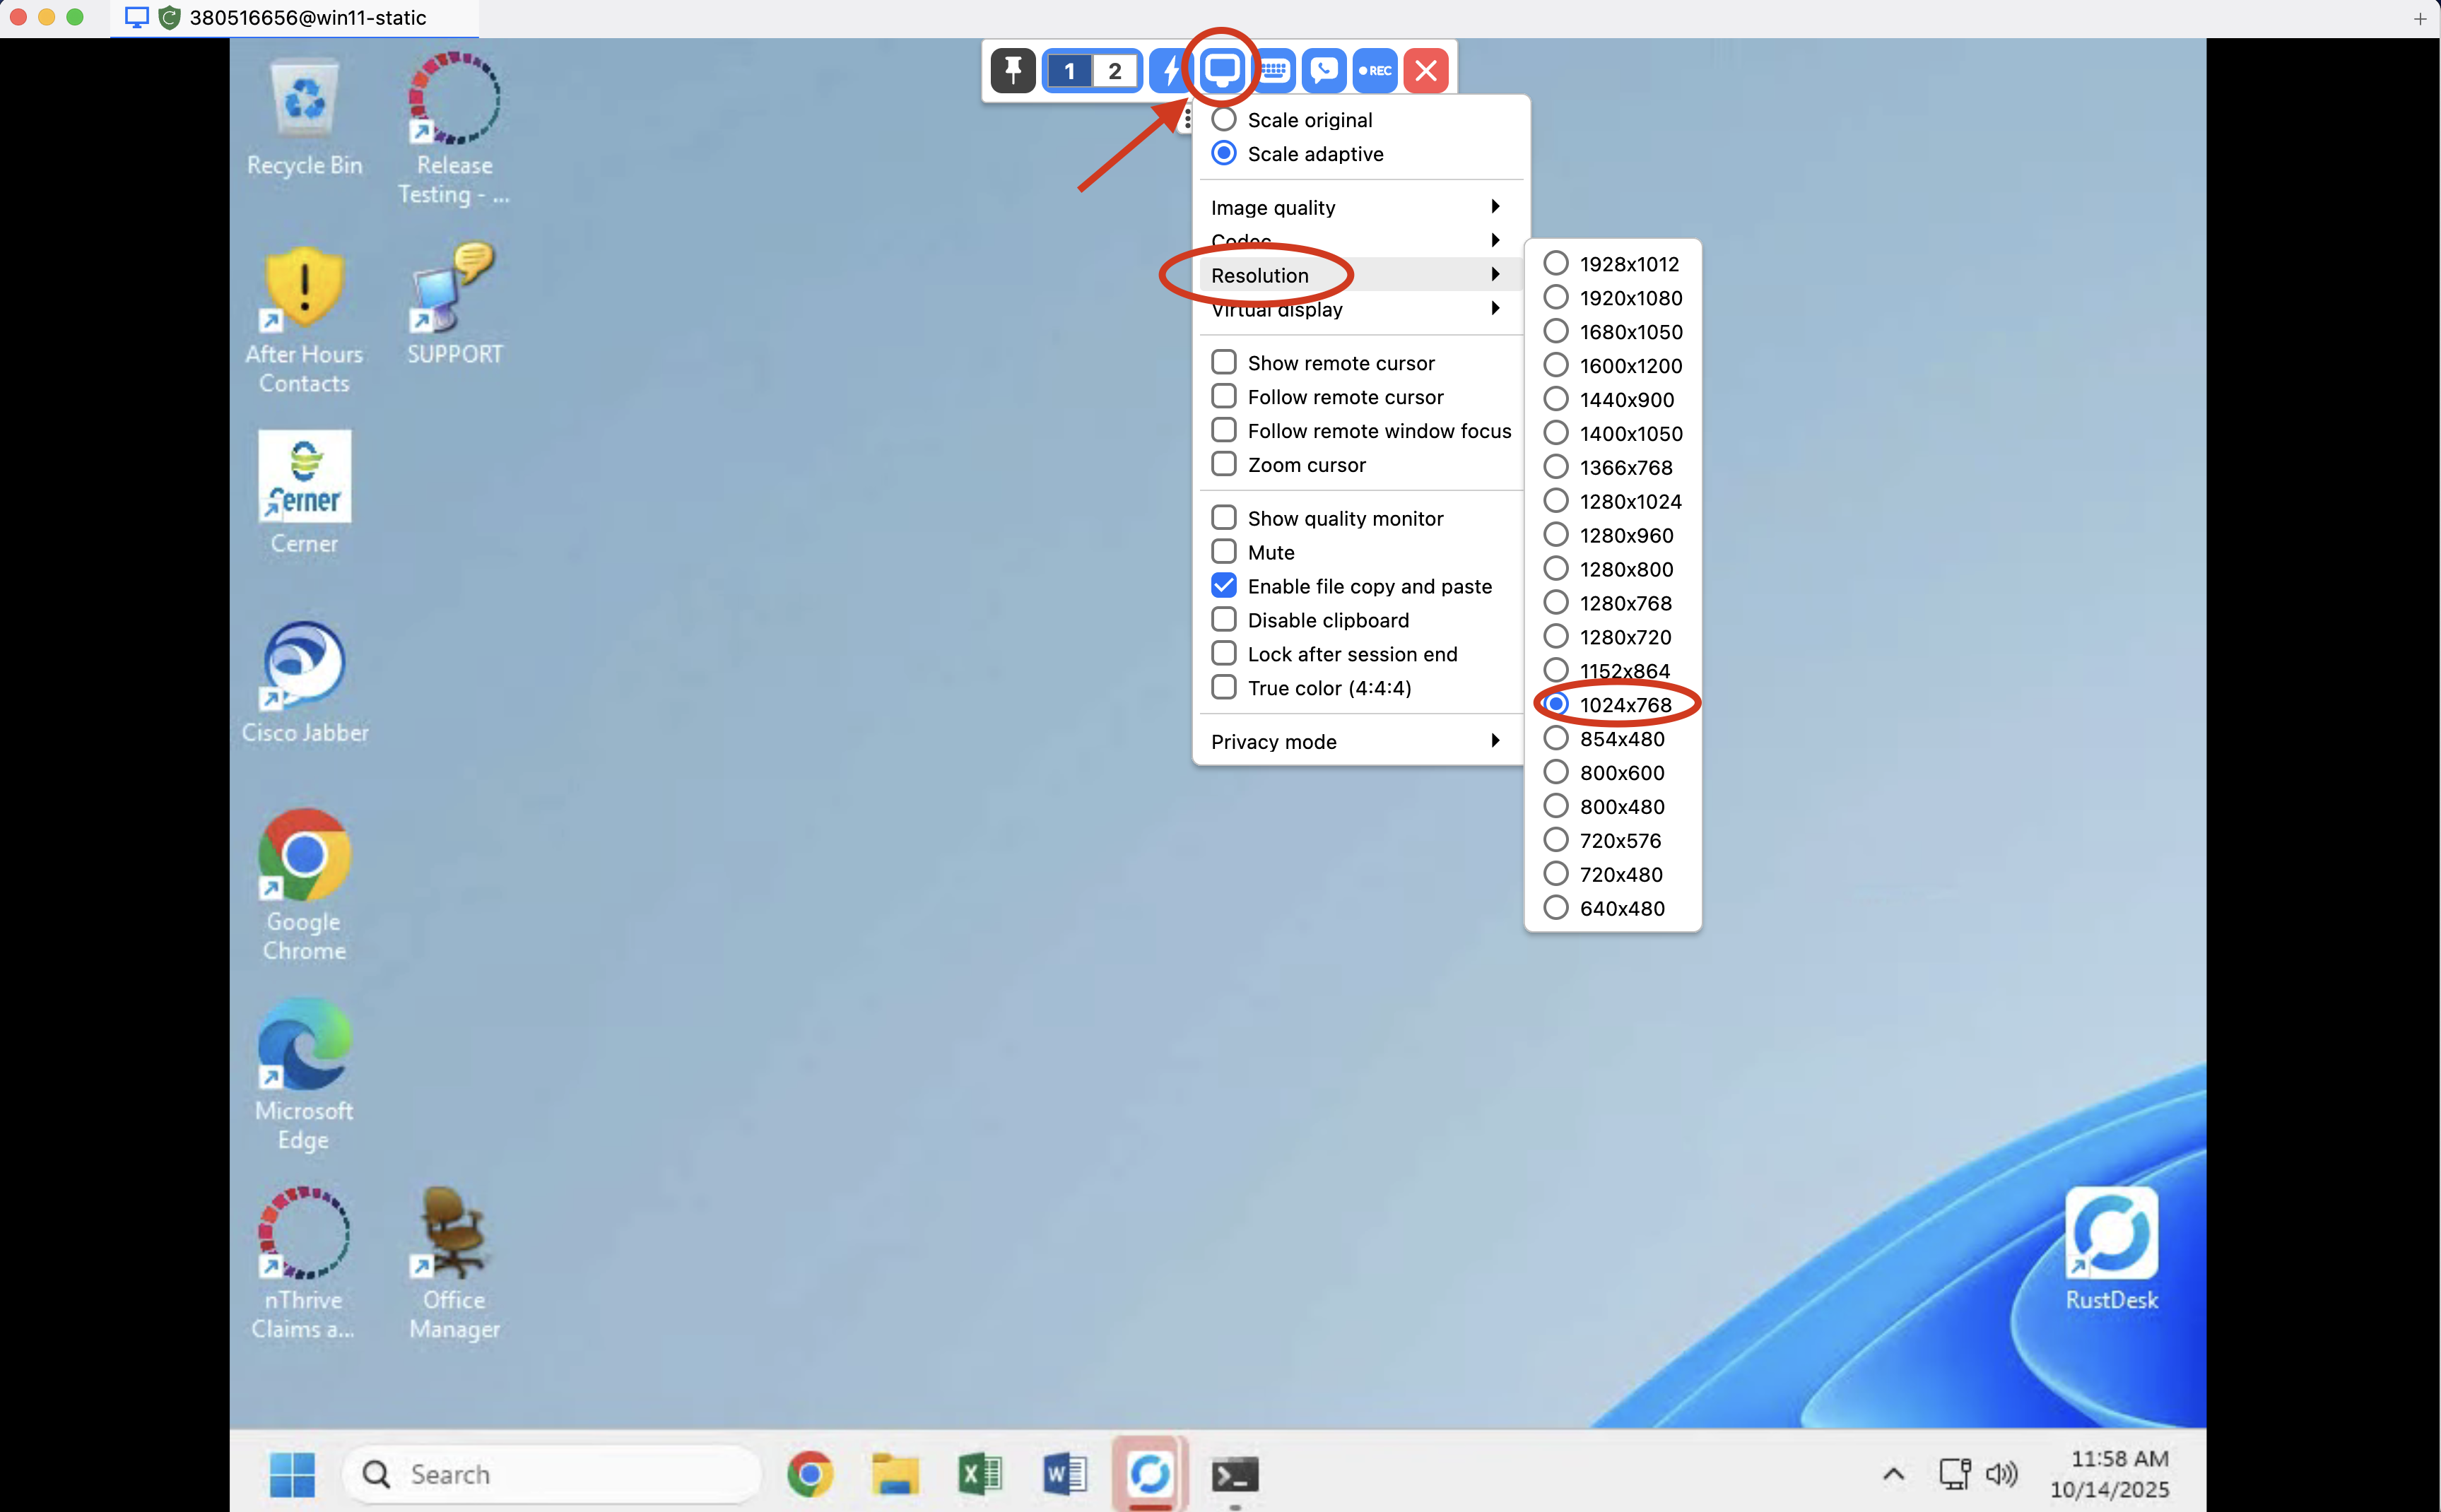
- In the RustDesk toolbar, click the Display icon
- Hover over Resolution
-
Select 1024x768

Install and configure Cyberdriver
Follow the Cyberdriver Installation Guide to set up desktop automation.Important recommendations:The keepalive mode ensures Windows doesn’t automatically lock and return to the login screen, which would interrupt automation.
- Use the
--keepaliveflag to prevent Windows from locking due to inactivity - Run Cyberdriver as Administrator if you need to automate applications that require elevated privileges
Close RustDesk (on your local machine)
You can now close the RustDesk connection on your local machine (Mac/PC).Important: Leave RustDesk running on the Windows VM—it helps keep the console display active for automation.Whenever you need manual access, simply open RustDesk on your local machine and reconnect using your saved credentials.
Optional: Stop RustDesk service for security
Once everything is set up and working, you can optionally stop the RustDesk service on the Windows VM for maximum security:
- Connect via RustDesk one last time
- Open RustDesk on the Windows VM
- Click the three dots menu → Settings
- Click Stop Service
- Close RustDesk
- ✅ Automation will continue working perfectly
- ✅ One less service running on the VM
- ✅ No remote desktop access possible (more secure)
- ⚠️ You’ll need RDP to access the VM if you need to restart RustDesk later
--black-screen-recovery flag. Every time you close an RDP connection, Cyberdriver will see a black screen unless it switches to the console session (which --black-screen-recovery handles automatically).Only stop RustDesk if you’re confident in your setup and comfortable using RDP for manual access. Most users prefer to keep RustDesk running for easier troubleshooting.
Force resolution to 1024×768 via Cyberdesk
Navigate to the Desktops page in your Cyberdesk Dashboard.
- Click on your Windows VM to open the desktop details page
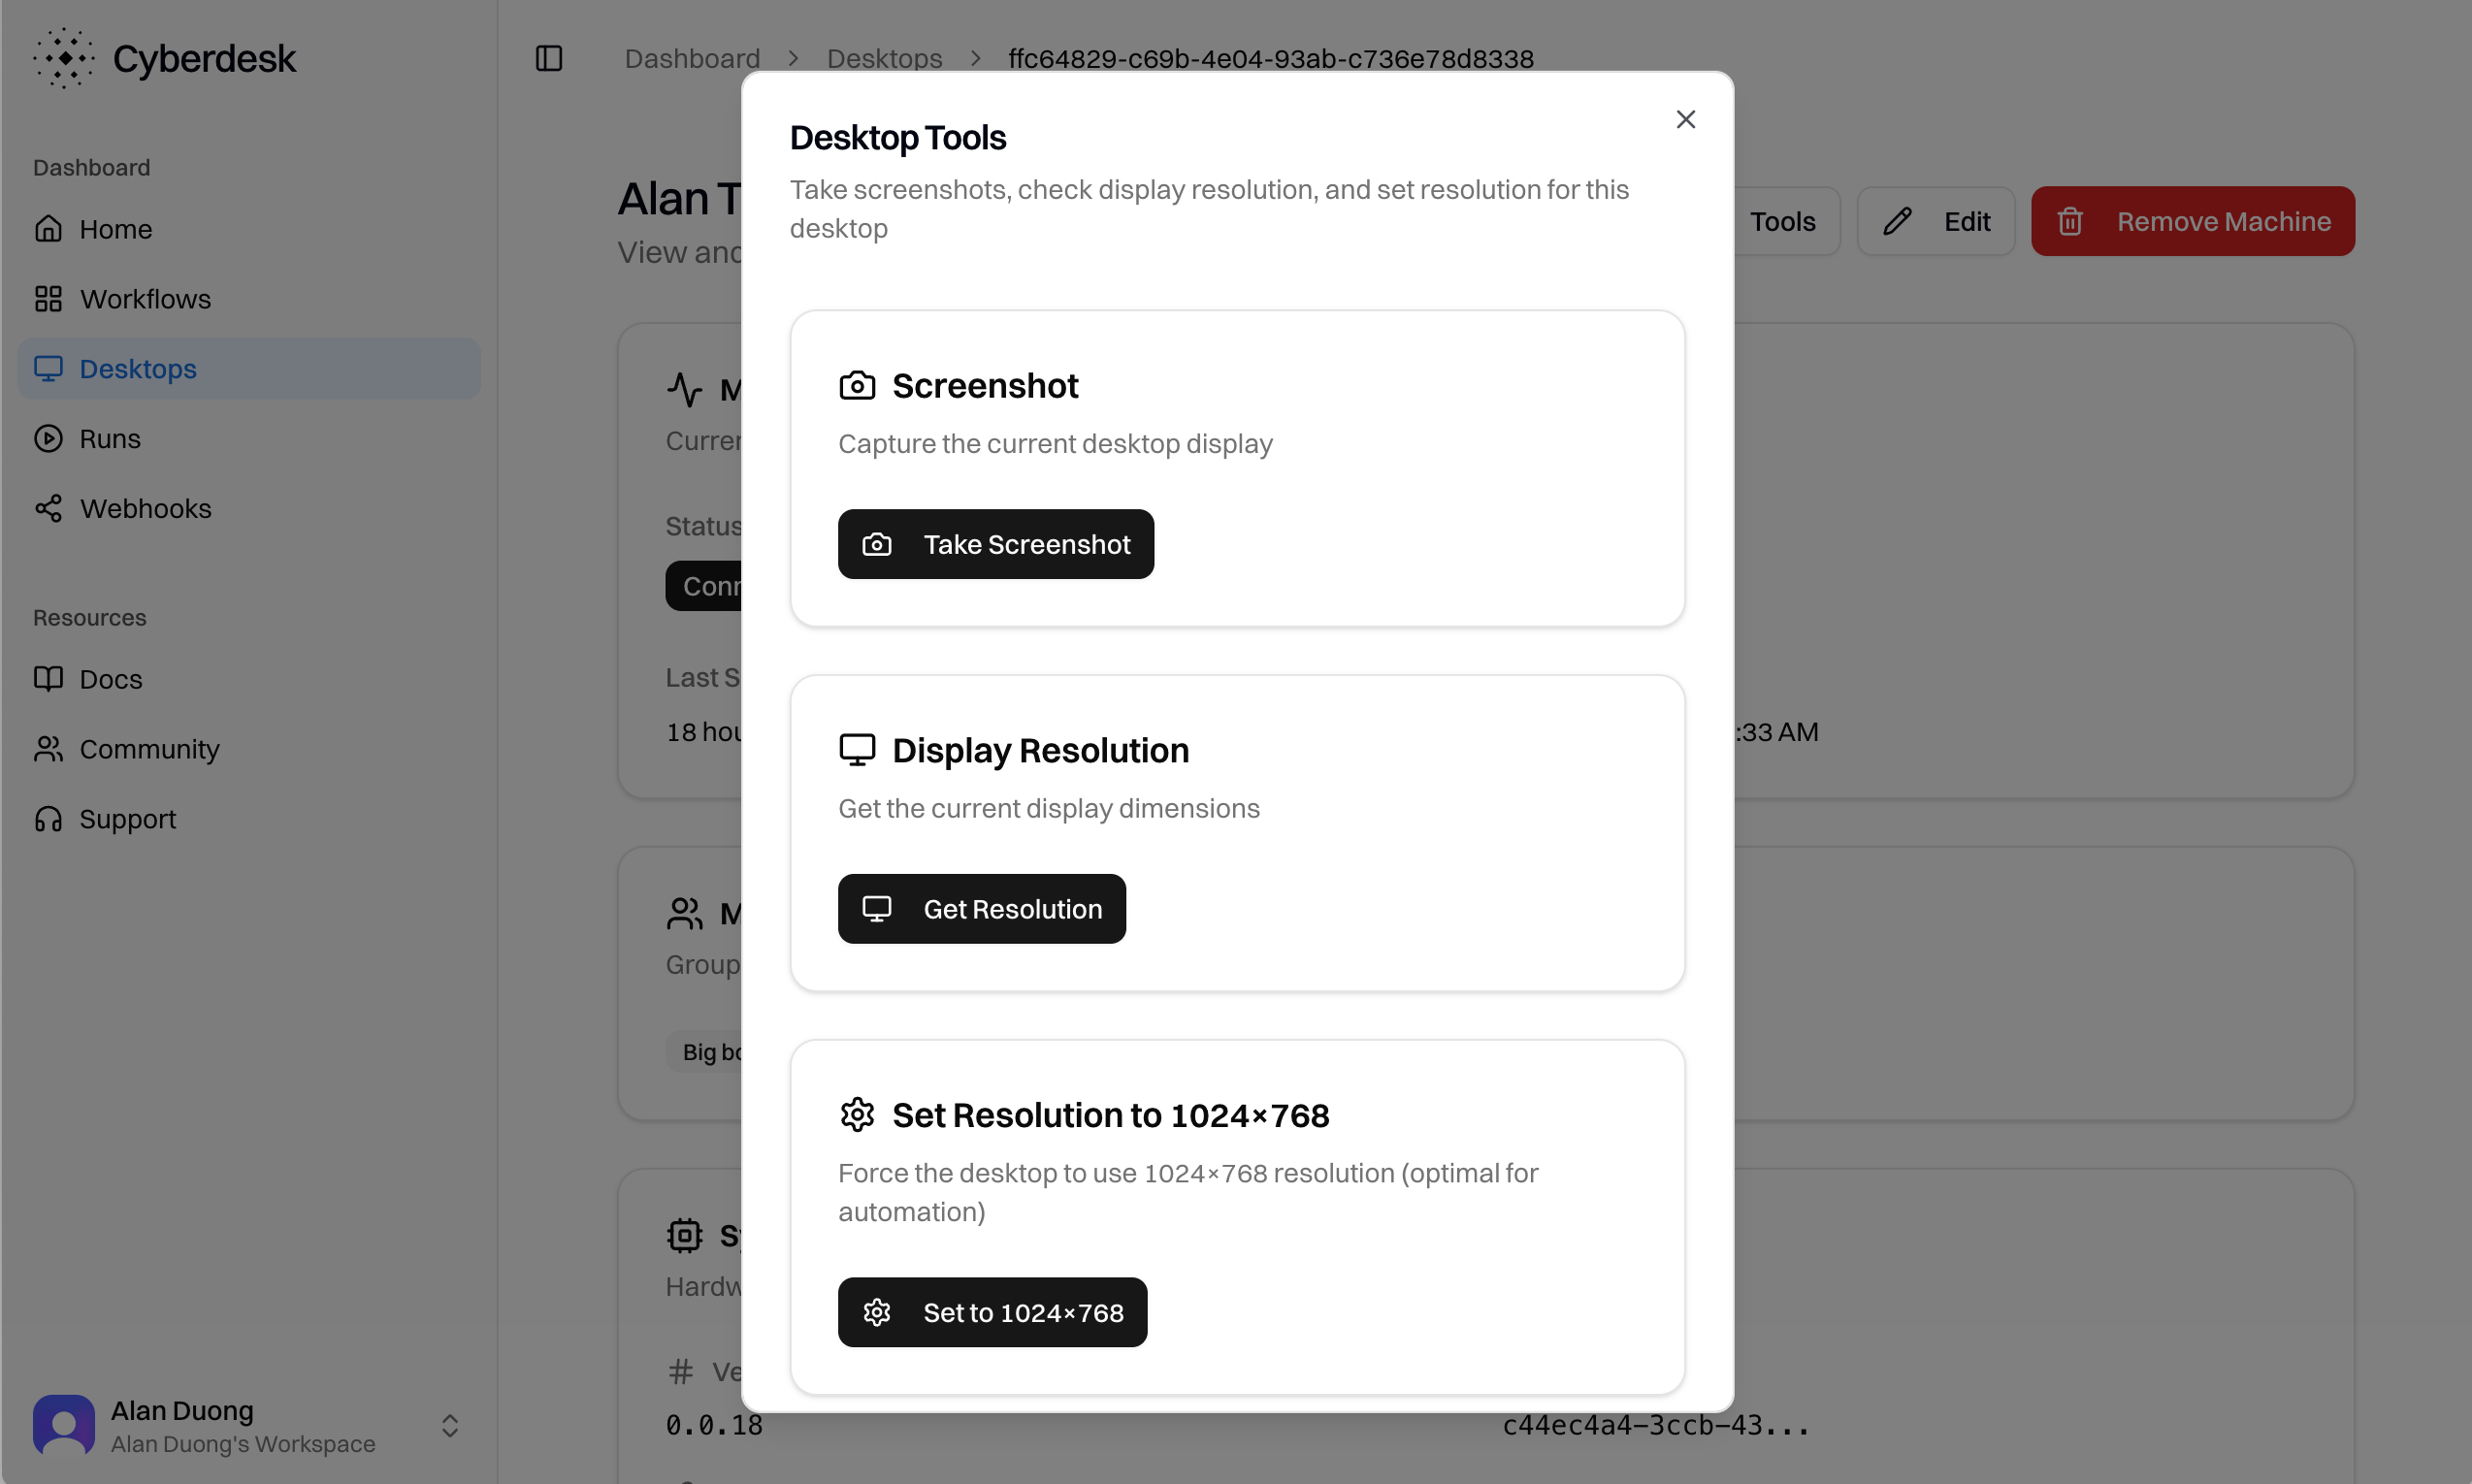
- Click the Tools button
- Scroll to the Set Resolution to 1024×768 section
-
Click Set to 1024×768

This step uses Cyberdriver to remotely execute a PowerShell command that sets the display resolution. Make sure Cyberdriver is running and connected.
Verify and finish setup
While still in the Cyberdesk Dashboard:
- Rename your desktop to something descriptive (e.g., “Production Windows Server” or “Client-ABC VM”)
- Verify the resolution shows 1024×768 in the desktop details
- Create a test run to confirm everything works
- ✅ Stay active without RDP connection
- ✅ Maintain persistent 1024×768 resolution
- ✅ Handle automation runs reliably
Troubleshooting
Cyberdriver sees black screen after opening and closing RDP connection
If Cyberdriver shows a black screen or stops working after you connect and disconnect via RDP, this is because RDP sessions don’t automatically switch to the console session when they close. Solution: Use the--black-screen-recovery flag when running Cyberdriver:
- Periodically checks for black screens (default: every 30 seconds)
- When detected, waits 5 seconds to confirm it’s not a transient black screen
- Automatically runs
tsconto switch the session to console - This restores Cyberdriver’s ability to see the RustDesk display
- When you RDP into a Windows machine, it creates an RDP session
- When you disconnect, Windows keeps that RDP session active
- Cyberdriver gets “stuck” viewing the disconnected RDP session (which is black)
- The console session (where RustDesk is active) is still running, but Cyberdriver can’t see it
- Black screen recovery switches Cyberdriver back to the console session
- Go to your desktop’s details page
- Click the Tools button
- Click Fix Black Screen
--black-screen-recovery runs automatically.
Windows keeps locking
If Windows returns to the login screen despite using--keepalive:
- Verify Cyberdriver is running with the
--keepaliveflag - Check that no Group Policy is forcing screen locks
- Check Windows power settings to ensure the display doesn’t turn off or the system doesn’t sleep
RustDesk not connecting to Windows VM
If your local RustDesk app (on your laptop/PC) won’t connect to the Windows VM, restart the RustDesk service on the Windows VM:- RDP into the Windows VM
- Open the RustDesk application on the Windows VM
- Click the three dots (⋮) menu → Settings
- Click Stop Service
- Close and reopen RustDesk on the Windows VM
- Click Start Service at the bottom of the window
- Try connecting again from your local RustDesk app
RustDesk connected but shows black screen
If RustDesk connects successfully but you only see a black screen, this is often a network/firewall issue. Common cause: Public WiFi networks (coffee shops, libraries, coworking spaces) often have strict firewalls that block video streaming traffic from RustDesk. Solution: Switch your network connection:- Use a mobile hotspot from your phone
- Connect to your home WiFi
- Use a different network without restrictive firewalls
If you’re still experiencing issues, reach out to the team at [email protected] - we’re happy to debug with you on a call.
RustDesk connection drops
If RustDesk frequently disconnects:- Check internet stability on both machines
- Verify no firewall is blocking RustDesk traffic
- Try using a custom RustDesk relay server for better stability
Automation runs fail
If workflows aren’t executing correctly:- Confirm Cyberdriver is running (check the Desktops page)
- Verify the resolution is exactly 1024x768
- Check that no Windows updates are pending restart
Clicks failing but typing works
If Cyberdriver can type but mouse clicks aren’t registering, this is often a virtual display initialization issue on certain Windows configurations. Fix: Add a second virtual display in RustDesk (even though you won’t use it):- Connect to the Windows VM via RustDesk
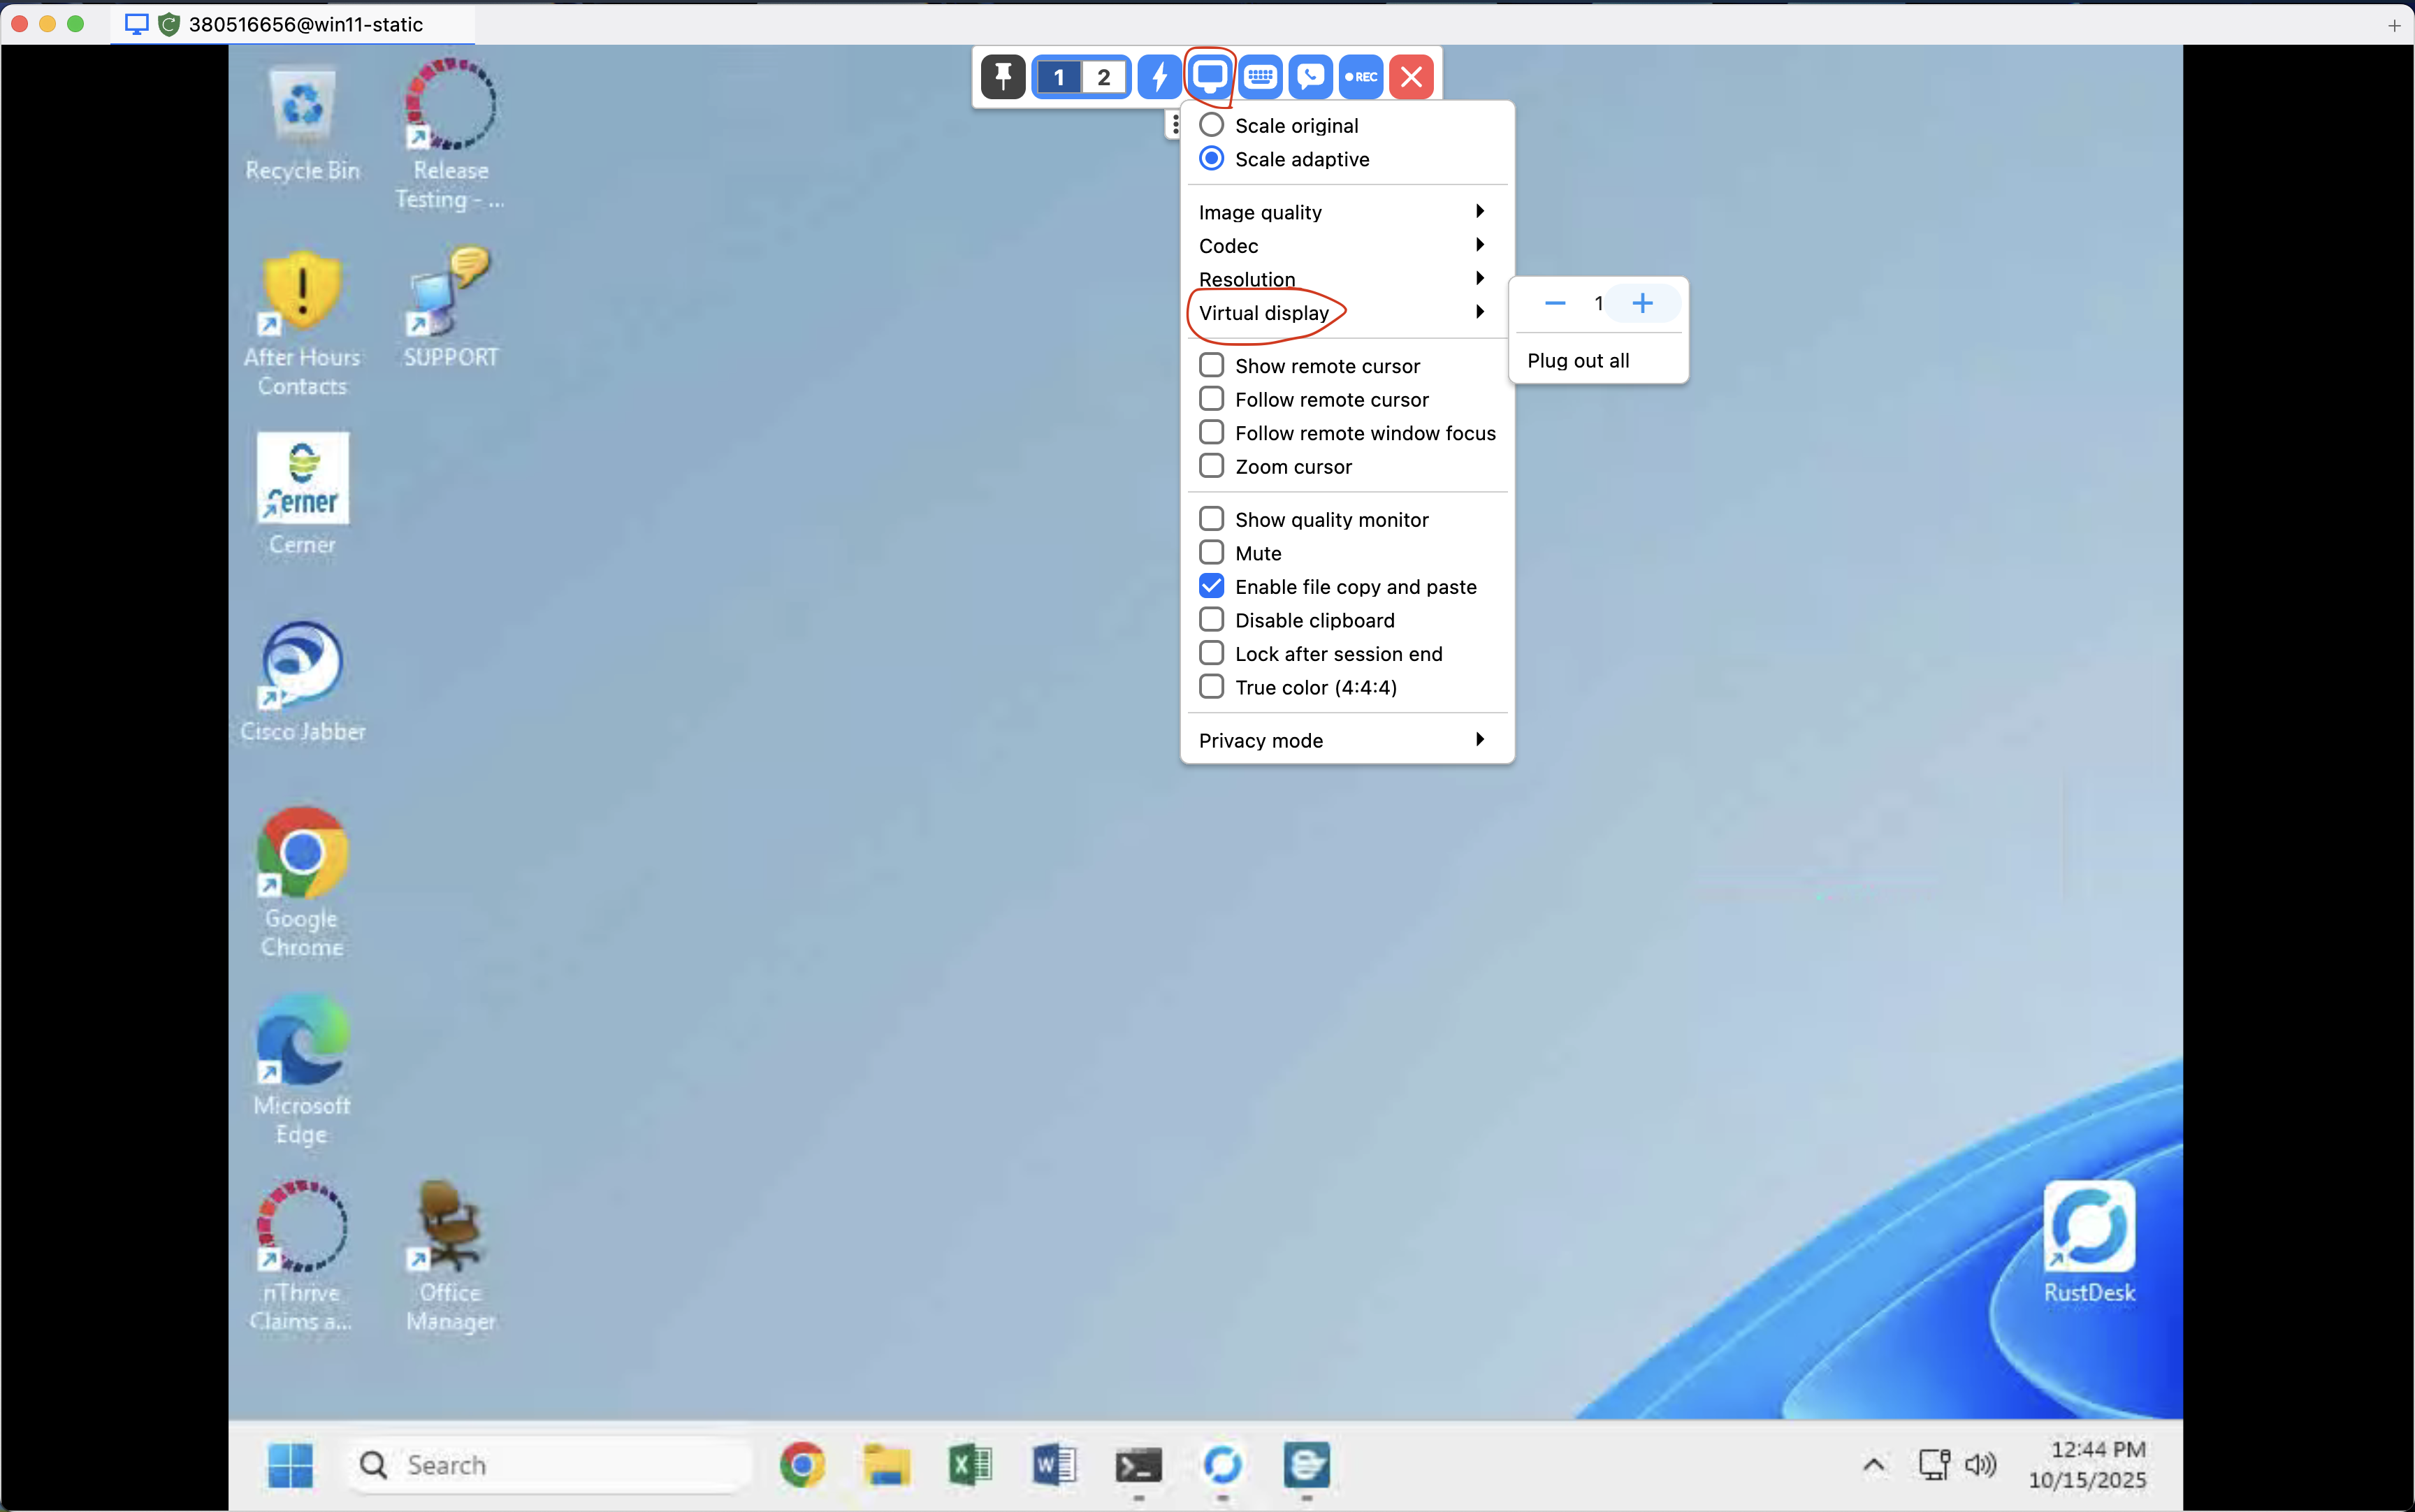
- Click the Display icon in the toolbar
- Click Virtual display
- Click the + button to add a second virtual display
- Stay on Display 1 (don’t switch to Display 2)
- Disconnect from RustDesk

This is likely related to how Windows handles mouse input when virtual display drivers are first initialized. Having multiple displays forces Windows to properly route input events to the virtual display adapter.